Modelling phases of the Moon

Modelling phases of the Moon

Pencil and paper
Overview
Using this Resource
Connecting to the Curriculum
Marking Student Responses
Further Resources
This task is about the different phases of the Moon.
How to do this task
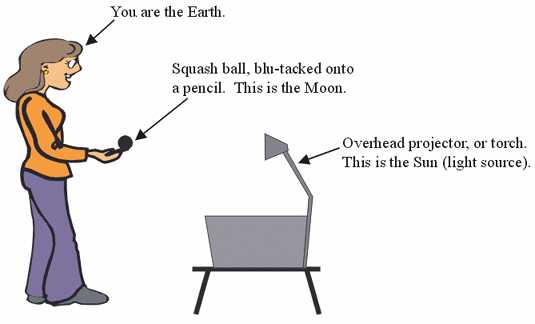
  • Use the equipment you have been given to model the different phases of the Moon.
  • The diagram below gives you an idea of how to set this up. 
 
diagram of modelling phases of the moon
 

Once you have set up your model, revolve the Moon around you (the Earth) to demonstrate the following phases of the Moon:

  1. A full Moon 
  2. A new Moon 
  3. A half Moon 
  4. A crescent Moon
Task administration: 
Equipment:
Squash ball; blu-tack; pencil; overhead projector or torch.
  • This activity can be done using a torch instead of an overhead projector.
  • The student needs to stand in a position that will allow the light from the torch/overhead projector to reach the ball when in position F.
Level:
4
Description of task: 
This practical resource requires students to demonstrate some phases of the Moon.
Curriculum Links: 
Science capabilities
The capabilities focus is brought about by the conversations you have and the questions you ask.
 
Capability: Interpret representations
This resource provides opportunities to discuss:
  • the use of models in science as a tool to understand phenomena that are too big or far away for us to see.
  • what a model shows, and how it is the same and different from the real thing.
 
Science capabilities: 
Answers/responses: 
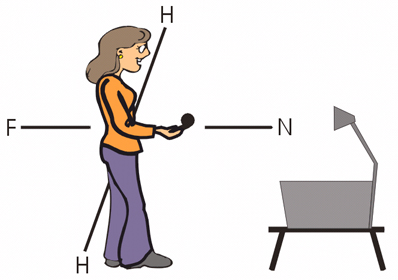
1 Places the Moon in position/near position F so that it is in full sunlight. (See below)
2 Places the Moon between themselves and the Sun, position N.
3 Places the Moon in either of the positions marked H.
4 Places the Moon in any position that is between N and H.