Clay model cross-sections

Clay model cross-sections

Pencil and paper
Overview
Using this Resource
Connecting to the Curriculum
Marking Student Responses
Further Resources
This task is about cross-sections of shapes.
 
a)
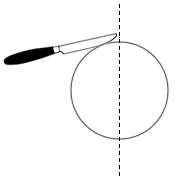
Use your modelling clay to make a ball. 
Cut the ball in half. 
Draw the shape of the cross-section in the box below.


b)
Use your modelling clay to make a cube. 
Carefully cut your cube in half. 
Draw the shape of the cross-section in the box below.


c)
Use your modelling clay to make a cone. 
Cut the cone in half. 
Draw the shape of the cross-section in the box below.


d)
Use your modelling clay to make a cylinder. 
Carefully cut the cylinder in half. 
Draw the shape of the cross-section in the box below.


e)
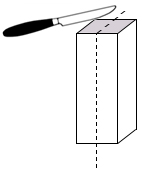
Use your modelling clay to make a cuboid/rectangular prism. 
Cut the cuboid in half. 
Draw the shape of the cross-section in the box below.


Task administration: 
This task can be completed with pencil and paper and other equipment.
 
Equipment:
One piece of modelling clay and one dinner set knife per student.
  • You may need to explain to students that they only need to draw the flat shape that is revealed once they have cut their object cross-wise.
  • You may need to point out to students that the diagram shows the direction in which to cut each shape.
  • You may need to have some shapes already made for those students who have difficulty constructing their own.
Level:
2
Description of task: 
In this practical task students construct 3-dimensional shapes from modelling clay then cut them in half and draw their cross-sections.
Learning Progression Frameworks
This resource can provide evidence of learning associated with within the Mathematics Learning Progressions Frameworks.
Read more about the Learning Progressions Frameworks.
Answers/responses: 


NOTE: Do not penalise for irregularities in cross-section sketches due to unevenness of construction of objects.

a)


b)


c)


d)


e)