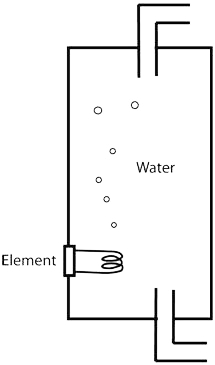
Hot water cylinder
|
a)
|
If the power to the hot water cylinder was turned off for 30 minutes, so that the element went cold, where would you expect to find the hottest water?
(A) At the bottom of the cylinder
(B) In the middle of the cylinder
(C) At the top of the cylinder
(D) Spread evenly throughout the cylinder.
|
Hot water cylinder
 |
b) In the space below, draw and label a diagram to explain why you chose your answer for a).
|
|
The cold water enters at the… bottom / top.
The hot water leaves from the… bottom / top.
- the conventions of diagrams and how they clarify the meaning for the reader.
- the relative benefits of using written or visual text to convey essentially the same set of ideas.
| Y10 (08/2009) | |||
| a) |
|
C |
moderate |
| b) |
|
The diagram should further unpack students thinking from question (a). We did not mark these diagrams. | |
| c) |
i) ii) |
Bottom/Top
Cold water enters at the bottom of a hot water cylinder and is heated by the element. The resultant hot water is less dense (particles are spread further apart) than cold water so will rise to the top of the cylinder where it exits through the outlet pipe. |
moderate difficult |
| Common response | Likely misconception | |||
| a) |
About 30 per cent of the students answered that the hottest water would be at the bottom of the cylinder. These students showed in their diagrams that the water would be hottest near the element. |
These students did not factor in convection. |
||
| a) | About 15% of the students answered that the hot water would be evenly distributed. These students showed in their diagrams that the hot and cold water circulated and mixed together. |
These students did show aspects of convection currents but did not factor in that the hotter water will tend to rise and stay near the top of the cylinder. See also c) ii). |
||
| c) i) | Nearly half of the students answered that the cold water entered at the top of the cylinder and hot water exited from the bottom of the cylinder. |
Again these students did not link hot water rising to the design of a hot water cylinder or they did not know about heat convection. |
||
| c) ii) |
Some students who selected that the cold water entered through the top of the cylinder explained it by using an alternative concept, for example:
|
This example shows the misconception that the hot water would need to deliberately lift itself to the top of the cylinder. |
|
c) ii)
|
The students who thought that the hot water would be evenly distributed used some understandings of convection currents such as:
|
These students have not understood that convection currents occur because of a temperature gradient. Colder water being denser than the warmer water will sink to the bottom of the cylinder and the hotter water being less dense will rise to the top. As the hot water cools down it becomes denser and sinks but is replaced with more, less dense, hot water (causing the current) so the top of the cylinder will always have the hottest water. |
Communicating science ideas
| 1. |
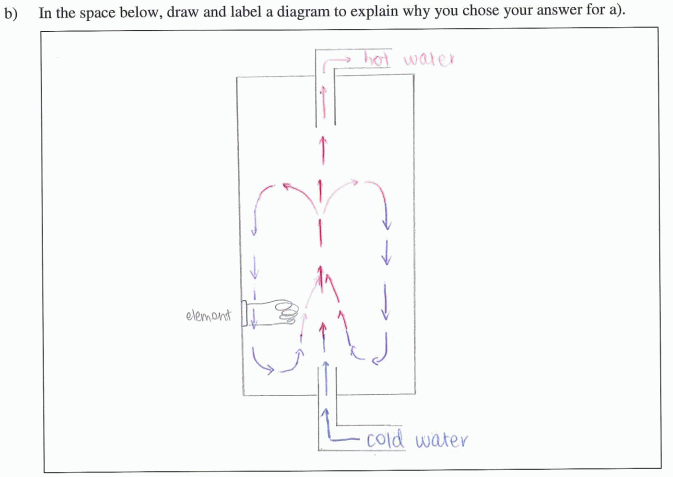
Using diagrams Most students drew very explicit diagrams with many mentioning that they preferred this method of explanation. In fact the diagrams often showed students understandings more clearly than their written explanations which were often sparse or muddled. Students seemed to give clear understandings because they could include important information concisely using science conventions, e.g., arrows and colours representing hot and cold water to show convection currents and just a few words when more detail was needed. Some students also used diagrams to show less dense hot water and more dense cold water. |
| 2. |
Good explanations Some students used the particle theory and the density of the hot and cold water in their explanation e.g.,
Other students explained convection currents in detail, e.g.,
Some students were able to transfer the science concept from another context, e.g.,
Many students understood that hot water rises and gave simple answers, e.g.,
|
Students who need to further develop their understanding of convection could be encouraged to use the particle theory to explain the changing density of the water as it heats. They could also demonstrate their understanding by relating the principles in other contexts. Recognising the same concepts in a range of different contexts makes it more likely that students will recognise when it is appropriate to use this explanation. In this task some students did successfully transfer the science concept from hot air or boiling water in an electric jug to the hot water cylinder. Other examples they could explore include hot air balloons, heating rooms, off and on shore winds and water currents.
Self assessment
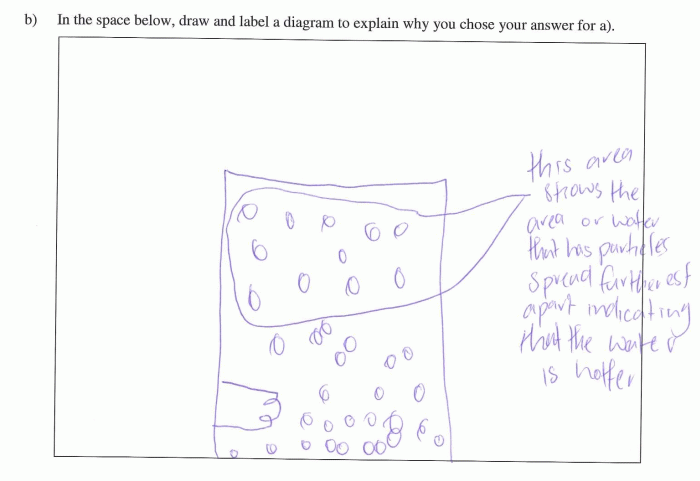
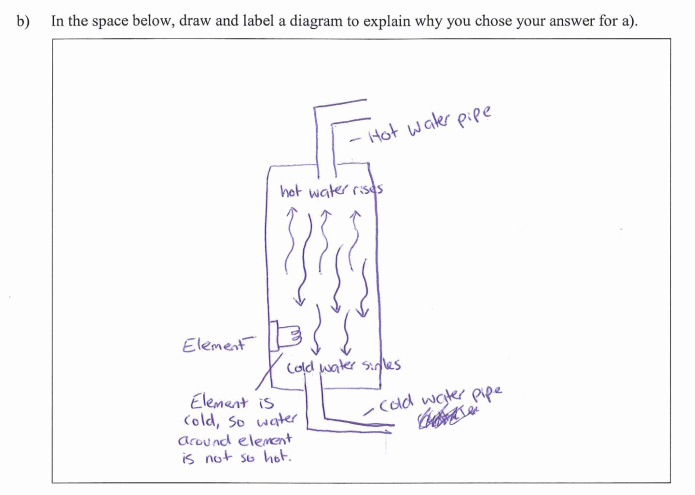
Students could compare their work with the student examples on the Student samples of work. They could look at each of the three diagrams and decide:
| • | What does each diagram show? |
| • | What does each diagram leave out? |
| • | Which diagram most effectively shows how the water behaves? |
They could then look at their own diagram and decide:
| • | How could my diagram be improved? |
Things they could look for include:
| • | hotter water particles being near the top of the cylinder |
| • | colder water particles being near the bottom of the cylinder |
| • | convection (movement of the water) caused by the temperature change, e.g., hot water particles rising and cold water particles sinking |
| • | hot water particles are spread further apart (this makes the water less dense) and cold water particles are closer together (this makes the water denser) |
| • | hot water exiting from the top pipe and cold water entering from the bottom pipe of the cylinder |
Example 1

Example 2

Example 3


