Making a pyramid

Making a pyramid

Pencil and paper
Overview
Using this Resource
Connecting to the Curriculum
Marking Student Responses
Working with Students
Further Resources
This task is about creating a net and making a 3-D shape.

Practical Task

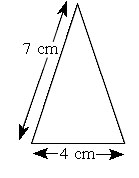
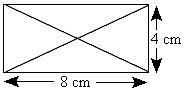
Make a model of the pyramid shown in the diagrams below.  


Front face


Side faces

Top view

[Not drawn to scale]

 
  1. Make the model using cardboard.
  2. Use a compass and ruler to make sure all your measurements are correct.
  3. Cut the net pattern out in one piece and fold it to make a pyramid.
  4. Use sellotape to stick your pyramid together.
Task administration: 
This task can be completed with other equipment.
 
Equipment
Cardboard; ruler; compass; sellotape.

Before beginning this activity you may want to clarify the meaning of "net pattern".

Level:
4
Description of task: 
In this practical task, students use three different views of a 3-dimensional shape to help them design a net and construct a model of a pyramid.
Learning Progression Frameworks
This resource can provide evidence of learning associated with within the Mathematics Learning Progressions Frameworks.
Read more about the Learning Progressions Frameworks.
Answers/responses: 
The pyramid net pattern has a rectangular base with 4 and 8 cm sides.
The pyramid net pattern has four isosceles triangle faces with accurately measured 7 cm sides that meet at the apex.

The pyramid net pattern has four isosceles triangle faces with sides that are within 1 cm of accuracy. They may not meet at the apex of the pyramid.

Diagnostic and formative information: 
  Common error Likely reason
b) The triangle faces do not meet at the apex. Measured 7 cm as the height of the triangle rather than the side length.