Measuring the angle

Measuring the angle

Pencil and paper
Overview
Connecting to the Curriculum
Marking Student Responses
Working with Students
Further Resources
This task is about measuring and drawing angles.

Some friends are building some skateboard ramps.They have to make sure they know how to measure angles.


a)
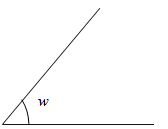
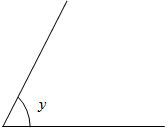
Use a protractor to measure and record the angle of each slope.
 
  i) ii) iii)
 
       
  Angle w = _______°    Angle x = _______° Angle y = _______°


b)
On the lines below draw and label the following angles using a protractor.
 
  i) 40° angle ii) 160° angle


Level:
4
Description of task: 
Students use a protractor to find given angles and draw angles of given degrees.
Curriculum Links: 
This resource can be used to help to identify students' understanding of measuring angles.
Answers/responses: 
      Y8 (11/2010)
a)


i)
ii)
iii)
50° [+/- 1°]
25° [+/- 1°]
63° [+/- 1°]
moderate
moderate
difficult
b)


i)

ii)

easy
moderate

Based on a representative sample of 183 Y8 students.

NOTE: These answers depend upon the type of protractor used: half circle or full circle. Obviously using a full circle protractor will make this assessment easier. However most protractors available tend to be half circle and it is therefore advisable to ensure that students can use these and add or subtract from 180º as required. This also indicates a better understanding about the size of angles (e.g., knowledge of 180º and 360º as benchmarks).

Teaching and learning: 

Prior knowledge
Students should have experience working with and measuring angles, and know about the rotational nature of angles.

Diagnostic and formative information: 

From all questions that involved measuring and drawing angles, most students could indicate that they knew how measurement of angles worked (rotationally between two points). The most common error involved indicating the supplementary angle (see below), followed by not labelling their drawing of given angles, and inaccuracy of the measurement. A number of students did not measure the angles shown in question a), however this may relate more to the accessibility (or familiarity) of protractors. For question b) most students could draw 40° angle to within 1 degree accuracy.

For question b) ii) fewer could draw the 160°; a notable number of students drew the smaller 20° supplementary angle (difference from 180°) rather than 160°.

  Common response Likely misconception
a) i)
ii)
iii)
b)
130 º [±1º]
155 º [±1º]
117 º [±1º]
[160º]

 
Opposite (supplementary) angle marked
Students have read their protractor reading for opposite angle. This suggests that they do not know where to begin and where to read the measure from on the protractor.
a) iii) 60º or 65º Measuring or rounding to the nearest 5º
Next steps: 

Students who cannot measure angles using a protractor
These students may first need to explore angles and identify half and quarter turns: the resource Making turns on Pirate Island looks at turns on a map. Then students can use the protractor to identify the number of degrees in quarter, half and three-quarter turns to develop a sense of the size of angles in degrees (90º, 180º, 270º, etc). Students could be asked how to place the protractor and where they read the measure from (see bullet points in Students who measured inaccurately below).

Students who measured inaccurately or rounded
These students indicate that they have an understanding of the how angles are measured, but need to work on the start and end point of the measurements. They could start by extending the lines in the diagram above to ensure that they continue to the scale, e.g., Student may also need to check that

  • they are lining up the baseline accurately
  • the cross hairs of the protractor are on the corner of the angle.

Students who measured the supplementary angle
These students could explore the sum of angles on a straight line by building up the larger angles from smaller acute angles (e.g., they could measure and label 40º, then add another 40º and label 80º, and so on to make 160º – all the time keeping in mind where they started measuring from. Students can also benefit from measuring a range of simpler angles and estimating the size of larger and smaller angles from a known angle (e.g., measure 60º and estimate 30º then 120º, and then 150 º). This should give students a sense of the size of angles.