Enlarge the arrow

Enlarge the arrow

Pencil and paper
Overview
Using this Resource
Connecting to the Curriculum
Marking Student Responses
Further Resources
This task is about what happens to shapes, lengths and areas under enlargement
Practical Task
This is a diagram of Arrow 1.
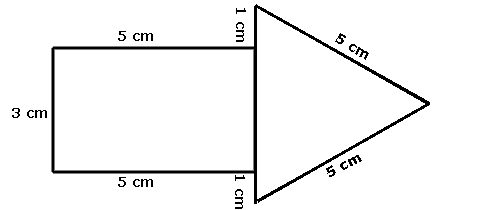
arrow shape
 
a)
Use the equipment to enlarge Arrow 1 by:
 
 
i)     a Scale Factor of 2 and label it Arrow 2.
 
ii)    a Scale Factor of 3 and label it Arrow 3.  
 
Show your teacher your enlargements so the measurements can be checked before you complete the table.
 
b)
The table below describes Arrow 1.
Complete the table for Arrows 2 and 3.  
 
Properties
Arrow 1
Arrow 2
Arrow 3
Length of rectangle
 5 cm
   
Size of triangle angles 60º    
Area of rectangle 15 cm2    
Shape of triangle equilateral    
Task administration: 
This task can be completed with pencil and paper and other equipment.
 
Equipment
Large sheet of paper; ruler; protractor; compass.
  • Before beginning this activity you may need to clarify the meaning of "scale factor" with students.
  • If the student cannot complete a), give them a correct arrow 2 plus arrow 3 and tell them to do part b).
Level:
4
Description of task: 
In this practical task students use a ruler, a protractor, and a compass to enlarge an arrow by two given scale factors. They then complete a table to show the invariant properties.
Learning Progression Frameworks
This resource can provide evidence of learning associated with within the Mathematics Learning Progressions Frameworks.
Read more about the Learning Progressions Frameworks.
Answers/responses: 
 
a) i)

ii)

Arrow 2
Correctly enlarges rectangle to 10 × 6 cm.
Correctly enlarges triangle sides to 10 cm.

Arrow 3
Correctly enlarges rectangle to 15 × 9 cm.
Correctly enlarges triangle sides to 15 cm.

b)  

Arrow 2

Arrow 3

10 cm 15 cm
60° 60°
60 cm2 135 cm2
equilateral equilateral